
TL;DR
Acoustic dampening and soundproofing are different: dampening reduces echoes inside a space, while soundproofing blocks sound transfer. Placing your rig in another room or a well-ventilated closet drastically cuts noise. Proper placement and structural decoupling matter more than foam alone.
Ever wonder why your closet studio still sounds boxy or leaks noise despite the foam on the walls? The truth is, treatment alone can’t fix fundamental issues like placement and structural noise. You can spend hundreds on foam, but if your rig is sitting right next to you or sealed in a closet without ventilation, you’re fighting a losing battle.
This guide cuts through the noise—literally and figuratively. You’ll learn how moving your rig, understanding the difference between dampening and soundproofing, and strategic placement can make your tiny space sound professional and keep noise out of other rooms. The goal? Quiet, clear recordings and a more peaceful home setup.
Acoustic dampening
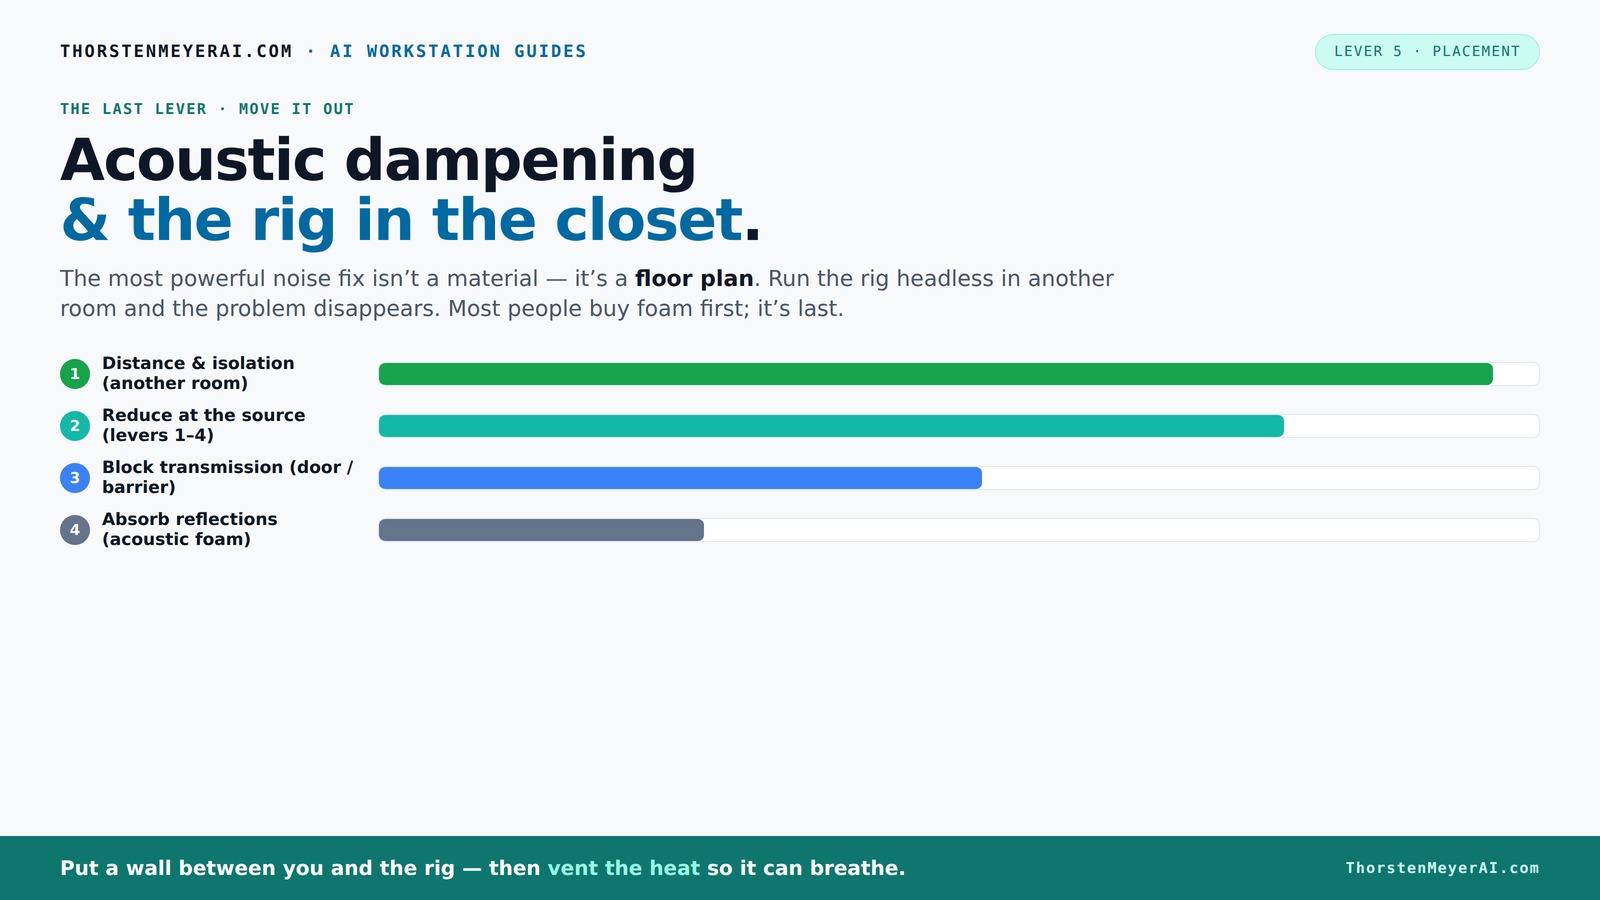
& the rig in the closet.
The most powerful noise fix isn’t a material — it’s a floor plan. A rig you can’t hear because it’s in another room beats any amount of foam. Tap the approaches in Part 1 to see what actually works.
(another room)
(levers 1–4)
(door / barrier)
(acoustic foam)
Contain the noise, not the heat
Key Takeaways
- Moving your rig to a different room or closet is the most effective noise reduction strategy.
- Acoustic dampening softens reflections but doesn’t stop sound from leaking; sealing gaps and adding mass are key for true soundproofing.
- Placement of panels at reflection points dramatically improves sound clarity, especially in small, reflective spaces.
- Vibration decoupling and ventilation are vital when placing a rig in a sealed closet to prevent heat buildup and structure-borne noise.
- Target low-frequency treatment with bass traps and corner absorption for a cleaner, more professional sound in tight spaces.

Focusound 52 Pack Acoustic Foam Panels 1" x 12" x 12" Sound Proof Foam Panles Soundproofing Noise Cancelling Wedge Panels for Home Office Recoding Studio with 300PCS Double-Side Adhesive
- Soundproofing Design: Triangular grooves for noise absorption
- Includes Adhesive Tape: 300pcs double-sided adhesive for easy installation
- Easy Shape Recovery: Soak in water to restore shape within 48 hours
As an affiliate, we earn on qualifying purchases.
As an affiliate, we earn on qualifying purchases.
Why Placement Trumps Foam Every Time
Placing your rig far away from your ears is the most effective way to cut noise. Think of it like a noisy neighbor’s dog—if you put a fence or move the dog to the backyard, the noise stops bothering you. The same idea applies to your computer or audio gear.
For example, if your high-powered GPU rig lives in a closet on the other side of the house, you won’t hear its roar—no matter how much foam you add inside your desk space. It’s the biggest noise reduction lever you have.
According to experts, distance and isolation outperform any acoustic foam or soundproofing material. Foam only absorbs sound inside the room, but it doesn’t stop sound from escaping or entering.
Why does this matter? Because many assume that filling a space with foam will contain all noise, but in reality, the physical separation and structural isolation are what truly prevent sound from traveling. The tradeoff is that moving your rig or creating physical barriers might require more effort upfront but yields significantly better results in noise reduction.
The 'Rig in the Closet' Setup — How to Do It Right
Putting a powerful rig in a closet can be a game-changer. It isolates noise, keeps your workspace quiet, and allows you to run the machine at full throttle without disturbing your environment. But here’s the catch: heat. A sealed closet traps heat, which can cook your hardware over time.
To do it right, you need ventilation. That means adding a vent or a quiet fan to circulate air. For instance, installing a small exhaust fan with a thermostat can keep temperatures stable without noise bleeding out.
Proper ventilation isn’t just about comfort; it’s about hardware longevity and consistent performance. Overheating can cause thermal throttling, which affects your workflow, and in extreme cases, hardware failure. Therefore, investing in a dedicated exhaust system or a vent with a muffler can prevent heat buildup while maintaining silence. Learn more about cooling and noise reduction in enclosed setups.
Want to learn more? Check out [this detailed guide on cooling and noise reduction in enclosed setups](https://thorstenmeyerai.com/reduce-heat-noise-ai-workstation/). Proper airflow isn’t optional—it’s essential for safe, quiet operation.
Acoustic Dampening vs. Soundproofing: Know the Difference
Acoustic dampening and soundproofing aren’t the same. Dampening materials like foam panels and bass traps soften echoes inside a space, making recordings clearer. Soundproofing, on the other hand, involves adding mass, sealing gaps, and decoupling structures to stop sound from escaping.
Understanding why this distinction matters is crucial. Dampening improves the quality of your recordings by reducing internal reflections and harshness, which is especially important in small, reflective spaces like closets. Conversely, soundproofing aims to prevent noise from leaking out or coming in, providing privacy and reducing disturbances to others.
For example, a closet lined with foam will reduce echo and harsh reflections but won’t keep your neighbor’s loud music out. To block noise transfer, you need to seal gaps around the door, add mass to the walls, or use specialized soundproof panels. These methods often involve tradeoffs, such as increased weight, cost, or complexity.
Research shows that structure-borne noise (vibration through the walls or floor) is best fought with decoupling, not foam. In small spaces, combining both strategies—dampening for internal clarity and soundproofing for external isolation—yields the best results, but each has its limitations and costs that should be considered.
Where to Put Acoustic Panels for Maximum Effect
Position matters more than quantity. Acoustic panels should go where sound reflections bounce back to your ears or microphone. Use a mirror trick: sit at your desk, angle a mirror to see the speakers, and place panels at those reflection points. For more tips, check out this guide on acoustic panel placement.
In a tiny closet, focus on the side walls, ceiling above your head, and behind your microphone. Covering about 20-40% of the surface area is usually enough for small spaces. For example, a few dense panels on the side walls and a bass trap in the corner can tame low-frequency muddiness.
Why is placement so critical? Because in small rooms, reflections tend to be harsh and low frequencies tend to build up quickly, causing muddiness and a boxy sound. Targeted placement ensures that the sound waves are absorbed at their primary reflection points, which prevents them from bouncing around and creating comb-filtering or echo. This focused approach is more efficient and cost-effective than covering all surfaces indiscriminately.
Sealing and Decoupling: The Real Soundproofing Moves
Adding mass and sealing gaps is the true way to block noise transfer. Think of old-school soundproofing like wrapping your walls with drywall, damping, and adding insulation. It’s not glamorous, but it works by increasing the wall’s ability to resist vibration and sound transmission. Learn more about sealing and decoupling for effective soundproofing.
Sealing cracks around the door, adding a door sweep, and insulating wall seams matter more than foam because they prevent direct sound leaks and reduce vibrations traveling through structural paths. For vibration and structure-borne noise, use rubber grommets, anti-vibration pads, and decoupling mounts, which break the direct path of vibrations, significantly reducing low-frequency transfer. This is especially important in small spaces where sound can easily transfer through thin walls or floors.
For example, a simple set of rubber feet under your PC tower can reduce vibrations transmitted into the desk, drastically cutting low-frequency hums. See how decoupling mounts can improve sound isolation.hat foam can’t handle. Combining mass addition with vibration decoupling creates a more comprehensive, effective barrier against noise.
Controlling Low-Frequency Rumble in Tight Spaces
Low-frequency rumble is the toughest to tame in a closet. Bass traps and corner absorption can help by targeting the specific standing waves and resonances that cause boomy, muddy sounds. For example, placing dense mineral wool or tuned bass traps in corners absorbs these standing waves, reducing overall low-frequency energy.
This is crucial because small rooms naturally amplify low frequencies, making your recordings muddy or your noise leak more noticeable. Without proper treatment, the low end can overpower your mix or cause your noise to be more intrusive. Soundproofing alone won’t fix this; you need targeted bass treatment, which involves strategic placement of bass traps and tuned absorbers to break up these low-frequency resonances.
Check out [this guide on low-frequency control](https://thorstenmeyerai.com/reduce-heat-noise-ai-workstation/) for more strategies. Remember, the goal is to smooth out the low end, preventing it from overwhelming your recordings or noise isolation efforts.
Practical Tips for a Quiet, Clear Closet Studio
- Use thick blankets or moving pads to cover gaps around the door and vents, ensuring a better seal and reducing sound leaks.
- Place acoustic panels at reflection points—behind your mic, on side walls, and the ceiling above your head—to absorb first-order reflections that cause comb-filtering and muddiness.
- Seal cracks with weatherstripping or acoustic sealant to prevent sound from escaping or entering through small gaps, which are often overlooked but critical for effective isolation.
- Decouple your equipment with rubber pads or grommets to prevent vibrations from transmitting into the structure, which can cause low-frequency noise and resonance.
- Ensure proper ventilation to prevent heat buildup in enclosed spaces, using quiet fans or vents designed for acoustic isolation. Overheating can cause hardware throttling or failure, so balancing cooling with noise control is essential.
For example, a creator used weatherstripping around a closet door, added a few bass traps in the corners, and installed a small fan with a thermostat. The result? Significantly less echo, and the rig runs cooler and quieter, demonstrating how strategic placement and sealing can vastly improve your setup.
Frequently Asked Questions
What’s the difference between acoustic dampening and soundproofing?
Acoustic dampening reduces echoes and reflections inside a room, making the sound clearer. Soundproofing blocks sound from escaping or entering—adding mass, sealing gaps, and decoupling vibrations. They work together but serve different purposes.
Where should I put acoustic panels in my tiny closet?
Place panels at reflection points—behind your mic, on side walls, and the ceiling above your head. Use a mirror to find these spots. About 20-40% coverage in key areas usually makes a noticeable difference.
Do foam panels actually soundproof a closet?
No, foam mainly reduces echoes inside the space. It doesn’t block sound transfer. For real noise reduction, seal gaps, add mass to walls, and decouple vibrations.
How do I stop echo and boxiness in a small space?
Use thick absorption directly around your mic and at reflection points. Cover hard surfaces with blankets or foam, and add bass traps in corners to tame low frequencies. Proper placement is key.
Are bass traps necessary in a closet studio?
They help control low-frequency buildup, which small spaces tend to amplify. If your recordings sound boomy or muddy, bass traps are a smart investment.
Conclusion
Remember: the best way to quiet your closet rig isn’t just with foam. It’s about where you put it, how you isolate vibrations, and ensuring it can breathe. Your audio quality and peace of mind hinge on these basic principles.
Imagine a tiny, silent workspace where your rig roars in the closet while you record crystal-clear vocals—no noise, no fuss. That’s the power of smart placement and strategic treatment. Your perfect home studio isn’t just a dream; it’s a few smart moves away.